January 15, 2016
How to Organize Digital Photos (Part 2 of 4) | Orange County Photographer
Welcome back!
In our last conversation, we were taking on the task of finding a good place to store your files once you have them ready to go. If you missed out on that, then go check it out here.
In this new post, we are going to explore the world of organizing your photos before and after they’re on your computer.
Now, strap in to your rocket ship and let’s take off to the extremely exciting world of digital photo organization! (I said that in a big booming voice, in case you’re wondering) :)
The two biggest factors to storing your images and being able to find them later come down to how they are labeled and where they are saved.
How to Organize Digital Photos by Labeling (Tagging)
This is also referred to as “tagging” them. This is something you can do before you even upload them to your computer, or wherever you wind up storing them. Depending on the phone that you have, there are different ways of doing this. It can be as simple as labeling folders on your phone with the date and event, or as sophisticated as getting an app that has face recognition scanning along with other automated tools. Whatever the case, just make sure you are consistent with how you tag and label your files, so that it is easier to reference later on.
It’s good to remember to not go too crazy with your descriptions though, as most computer systems have a limit on the number of characters you use in your description.
Here is an example of how you can label your images: “2015_5_25_Family_Picnic”
Labeling along those lines will allow you to sort by date and family event because the search tool will first pull up the date, then the word “family”, then sort by the family event “picnic”. Is this starting to make sense now? I hope so.
Another thing that you can do to tag your photos is to turn on “geo tagging” on your phone or photo device. This will tag the location of where the picture was taken so that you have an immediate reference point for say all of the photos you took at the Grand Canyon, etc.
If you’re looking for an easy way to tag your images through your iPhone, then check out this new app that I found called PhotoTime. It has facial recognition and will automatically tag different components of your image so that you can easily search for them later.
How to Organize Digital Photos by Creating Folders
So, now that you have all of your wonderful memories tagged and labeled, how do you store them so you can find them easily later on? I’m glad you asked.
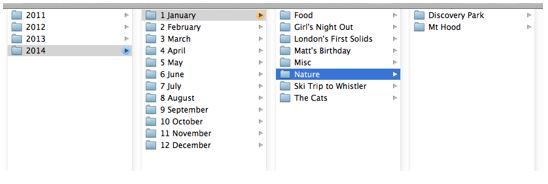
Here is the best way that I’ve found to store images on your computer. You want to break everything down into files, so that each file is a separate piece of the puzzle. Here’s an example:
Try something like this:
- Create a year folder
- Create a month folder and begin each month with the number of the month
- Make a few subject folders for each month that you know you’ll already have (i.e. birthdays, holidays, vacations, etc.)
- Next you can make sub-folders under those if necessary
- Otherwise, simply create sub-folders as you download your images onto your computer. This is also a good point to start deleting photos that you don’t want to keep.
I hope this helps get you on the path to saving your memories and being able to easily find them later and stay tuned for our next post in the “How to Organize Your Digital Photos” series.
Read Part 3 | Organizing Your Digital Portraits
Orange County Family Photographer, Kincannon Photography is a professional photographer in Orange County, California capturing newborn, seniors, dog, children and family portraits.
Kincannon Photography is based in Yorba Linda, and serves all surrounding areas including Newport Beach, Irvine, Corona Del Mar, Brea, San Juan Capistrano, Aliso Viejo, Mission Viejo, Costa Mesa, Fullerton, Villa Park, Laguna Beach, Newport Coast, and other surrounding Orange County metro areas.


facebook
instagram
contact
Stay in Touch: